

 has the facebook
Officeworks for Business
A business account offers a streamlined way for organisations of all sizes to purchase business products, manage purchases and track expenses.
Officeworks for Business offers:
- Automatic savings: Save 5% on hundreds of business essentials*
- 30-days to pay: Apply now to stay on top of your cash flow**
- Free delivery: Free standard metro delivery on orders over $65^
Find out more how Officeworks for Business can benefit you and apply today.
*Excludes account holders who have negotiated business pricing ^Delivery exclusions apply. **Subject to credit approval.
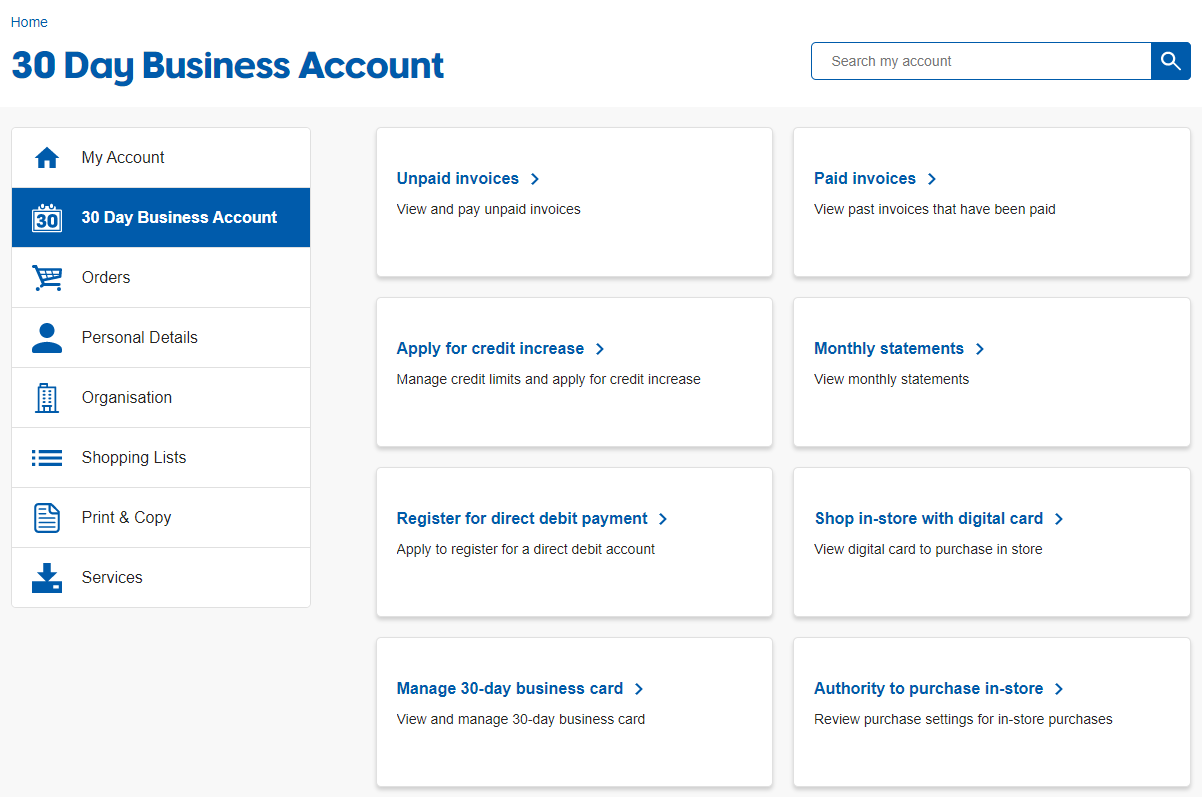
30 Day Business Account
As a Business Account holder, you can apply for a 30-Day Business Account, allowing you to purchase your Officeworks goods on credit and receive a monthly invoice. This helps keep your business and personal spending separate and makes it easier to stay organised at tax time.
Apply for a 30 Day Business AccountYour Business Account Features
Customers with a registered ABN or ACN can now apply for a Business Account and further to that, a 30 Day Business Account.
An Officeworks Business Account gives you the ability to control and manage your workplace’s shopping experience online. It’s simple, quick, and convenient.
Features that are available to Business Customers can be found in Organisation details, and the extra functions available to 30 Day Account Customers, under the 30 Day Business Account.

Managing Delivery Addresses
You can add multiple addresses to your Business Account. This makes the ordering process quick and easy.
Adding an address:
- Within My Account, click on ‘Organisation’ in the lefthand side menu, then click on the ‘Addresses’.
- You’ll land on the ‘Addresses’ page. Click ‘Add new address’.
- You’ll see the below ‘Add new address’ form. Start typing the address into the ‘Enter your address*’ field.
- Address lookup suggestions will appear after you type the first three characters. Select the correct address from the list of suggestions.
- Select an ‘Address type’:
- Delivery: The address where your orders will be delivered (must be a physical address not a PO box)
- Invoice: The address that will appear on the invoice
- Delivery & Invoice: This address will be used for both delivery and invoicing purposes
- Optionally, you can select the checkbox below to set this address as the default for both delivery and invoicing. Note: If a default delivery or invoice address already exists, checking this box will replace it with the new one.
- Complete all mandatory address fields and fill in any optional fields as needed.
- Or, if your address doesn’t appear in the list of suggestions using the address lookup, you can manually add the address by clicking the ‘Enter address manually’ link and complete the mandatory fields and click ‘Add Address’
Deleting an address:
- Within My Account, click on ‘Organisation’ in the lefthand side menu, then click on the ‘Addresses’ tile.
- Once you've located the address you wish to delete, click ‘Delete’ in its row. Click ‘Delete address’ in the confirmation pop-up.
Managing Account Settings
As an Administrator for your Business Account, ‘Account Settings’ makes it easy for you to control how your Admins and Members interact with your Officeworks Business Account.
To change these options, go to ‘My Account’, then ‘Organisation’ then click on the ‘Settings’ tile. The options available to you are:
Contacts
| Option | Description |
|---|---|
| Allow members to manage addresses | On by default – both Admins and Members can manage addresses. Turn off to allow Admins to restrict access and assign delivery addresses per user. |
Workflow
| Option | Description |
|---|---|
| Enable internal reference codes | Off by default. Turn on to let Admins create codes that can be assigned to orders (e.g. project, department). |
Payment
| Option | Description |
|---|---|
| Enable Credit Card for members | Credit card is available at checkout by default. Turn off this setting to disable it. |
| Enable Paypal for members | PayPal is available at checkout by default. Turn off this setting to disable it. |
| Enable Afterpay | Afterpay is available at checkout by default. Turn off this setting to disable it. |
| Enable Zip Pay | Zip Pay is available at checkout by default. Turn off this setting to disable it. |
Delivery
| Option | Description |
|---|---|
| Enable Click & Collect for members | Available by default – Admins and Members can place Click & Collect orders. Turn off this setting to disable Click & Collect for Members. |
Display
| Option | Description |
|---|---|
| Display price inclusive of GST(catalogue, cart and checkout) |
Prices are shown inclusive of GST by default. Turn off this setting to display prices excluding GST. |
| Display product view to grid | Grid view is on by default. Turn off this setting to view products in a list. |
Order
| Option | Description |
|---|---|
| Require Purchase Order at checkout | The Purchase Order field is optional by default. Turn on this setting to make it mandatory at checkout. |
30-day Account
| Option | Description |
|---|---|
| Enable 30-day account as a payment option at checkout‡ | 30-day account is available at checkout by default. Turn off this setting to disable it. |
| Display company credit limit to members‡ | 30-day credit balance is shown to Members at checkout. Turn off this setting to hide it for Members. This setting does not affect Admins. |
Note: ‡30-day credit account settings are displayed only when the account has been approved for 30-day credit.
Ordering on Behalf of Another Contact
To order on behalf of another contact, follow the below steps in the checkout.
- If your account has more than one contact (Admin or Member), from the ‘Review items’ step in the checkout, click ‘Select a new contact’.
- You’ll land on the ‘Customer details’ step of the checkout. Click into the ‘Who are you ordering for?’ (Optional) dropdown and select the relevant contact.
- Click ‘Continue checkout’.
- You’ll land on the ‘Delivery preferences’ step of the checkout, which will have the name you selected.
- Complete the order.
Please note: The order confirmation and other order communication emails will be sent to the contact who you ordered on behalf of.
Ordering for an Alternative Address
If your account has multiple delivery addresses:
- Go to the ‘Delivery preferences’ step of the checkout
- Click ‘Select another address,’ and choose the alternative delivery address you want from the list
- Complete the order.
The delivery address will be displayed in the post purchase emails.
Delivery Address Permissions
As an Administrator, you can control which delivery addresses your team members can access during checkout using the Delivery Address Permissions feature. This ensures each contact only sees the relevant addresses for their role or location.
Turn on Delivery Address Permissions (accounts without Order Approvals or 30 Day Account Management)
If your account doesn’t use Order Approvals or 30 Day Account Management:
- Go to ‘Account Settings’ within the ‘Organisation’ section of My Account.
- Scroll to the ‘Contacts’ section and disable the ‘Allow members to manage addresses’ setting Under the ‘Contacts’ heading, disable the ‘Allow members to manage addresses’ setting.
You’ll now see a new section called ‘Delivery address permissions’ in the ‘Manage contact’ page for each contact.
Important: After enabling the feature, you must assign delivery addresses to each relevant contact. If this is skipped, they will see all delivery addresses on the account during checkout.
Assign delivery address permissions
- Go to ‘Account contacts’ within ‘Organisation’ in My Account.
- Click ‘Manage’ on the relevant contact.
- In the ‘Delivery address permissions’ section, click ‘Edit’.
- Tick the addresses the contact is allowed to order to and click ‘Save changes’.
Only the selected addresses will appear in the contact’s checkout view.
Edit or remove delivery address permissions
- Go to ‘Account contacts’ under ‘Organisation’ in My Account.
- Click ‘Manage’ for the relevant contact.
- Click ‘Edit’ in the ‘Delivery address permissions’ section.
- Select or deselect addresses using the checkboxes.
- Click ‘Save changes’.
The changes will apply immediately and only the updated addresses will appear at checkout.
Turn on Delivery Address Permissions (accounts with Order Approvals or 30 Day Account Management)
If your account uses Order Approvals or 30 Day Account Management, please contact Officeworks Support to manage Delivery Address Permissions for your account.
Cost Centre Permissions
As an Administrator, you can control which cost centres your team members can assign orders to during checkout using the Cost Centre Permissions feature. This ensures each contact only sees the relevant cost centres for their role or department.
Turn on cost centre permissions (accounts without Order Approvals or 30 Day Account Management)
If your account does not use Order Approvals or 30 Day Account Management:
- Login to your Business account and go to ‘Settings’ within the ‘Organisation’ section of My Account.
- Enable the ‘Allow certain contacts to assign orders to specified cost centres’ account setting (it will be disabled by default).
Important: If Order Approvals or 30 Day Account Management are enabled, this setting will have no effect. Admins from these accounts should contact Officeworks Support to manage Cost Centre Permissions.
Note: This is temporary and will change once all features are migrated to the new platform.
Result: You’ll now see the ‘Cost centre permissions’ section in the ‘Manage contact’ page.
Next step: After turning this on, make sure to assign cost centre permissions to each relevant contact. If this step is skipped, contacts will see only their own default cost centre at checkout.
Set up cost centre permissions (for accounts without Order Approvals or 30 Day Account Management)
Before you begin: Ensure the cost centre permissions feature is enabled.
- Go to ‘Account contacts’ within the ‘Organisation’ section of My Account.
- Click ‘Manage’ for the contact you want to set permissions for.
- In the ‘Cost centre permissions’ section, click ‘Edit’.
- Select the cost centres the contact is allowed to order to and click ‘Save changes’.
Result – Manage contact page: Clicking ‘View cost centres’ will show only the additional cost centres assigned to the contact (their default cost centre will not be shown here but remains available in checkout).
Result – Checkout: The contact will see only the cost centres assigned to them, plus their default cost centre, in the checkout dropdown.
View, edit or remove existing cost centre permissions (for accounts without Order Approvals or 30 Day Account Management)
- Go to ‘Account contacts’ within the ‘Organisation’ section of My Account.
- Click ‘Manage’ for the relevant contact.
- Click ‘View cost centres’ to view only, or ‘Edit’ to update or remove permissions.
- In ‘Edit’, use the search field to add or deselect cost centres and click ‘Save changes’.
Result – Manage contact page: Only selected cost centres will appear in the ‘Cost centre permissions’ section. The contact’s default cost centre will not appear here but remains available in checkout.
Result – Checkout: The contact will see only the assigned cost centres, plus their default, in the dropdown list at checkout.
Turn on cost centre permissions (accounts with Order Approvals or 30 Day Account Management)
If your account uses Order Approvals please contact Officeworks Support to manage Delivery Address Permissions for your account.
Internal Reference Codes
As an Administrator for your Business Account, ‘Internal Reference Codes’ makes it easy for you to manage and apply optional codes that can be applied to orders – such as project names, departments, or budget lines – for clearer organisation and reporting.
To enable and manage this feature, go to the ‘Account Settings’ section within ‘My Account’.
Enable internal reference codes for an account (Admins)
- Login to your Business account and go to ‘Settings’ within the ‘Organisation’ section of My Account.
- Within the ‘Account settings’ page, turn on the ‘Enable internal reference codes’ account setting (it will be disabled by default).
Result: A confirmation message will appear with a link to the Internal Reference Codes section.
You’ll see the new Internal Reference Codes section appear in the tabs or left-hand navigation.
Set up internal reference codes
Before you begin: Confirm that the Internal Reference Codes feature has been enabled for the account.
- Go to the Internal Reference Codes section, either from the tab or the left-hand navigation.
- Click ‘Create code’.
- Enter a code or name and an optional description, then click ‘Create code’.
Result: Contacts on the account will now see the new internal reference code listed. Admins can create, edit, and delete codes. Members can view only.
Select internal reference codes in checkout
Before you begin: Confirm that internal reference codes have been set up.
- Add items to your cart and click ‘Checkout’.
- Select specific internal reference codes for each line item, or apply the same code to all line items.
- Complete your order.
Result: The internal reference code(s) will appear on the ‘Thank you’ page, the ‘Thank you’ email, the Tax Invoice, and in the ‘Order history’ section of My Account.
Order Approvals
Order approvals, can be setup on your account to help manage your company’s spending. Any orders that meet the approval requirements, will pend until approved.
This feature must be enabled and applied to your account through discussions with your Business Specialist.
To set this up, you must create an order rule and an approval group.
Order RulesTotal Order Value rule (orders above a set dollar value will require approval) OR Business Priced Products only rule (orders for products outside the predefined Business Price List, will require approval)
Approval GroupsSelected contact(s) on the account, allocated to approve orders (can contain administrators and members)
Creating and Maintaining Order rules
If you are an Administrator, you can create, edit or delete order rules from the ‘My Account’ page, by clicking on the ‘Manage order rules’ link.
- To create a new rule, select ‘Create new order rule’
- To edit a rule, locate the rule and select the ‘Edit’ button
Note: Updates to a rule, will reflect against any contact it is applied to
- To delete a rule, locate the rule and select the ‘Delete’ button
Note: The rule will be removed from any contact it is applied to
Creating and Maintaining Approval groups
If you are an Administrator, you can create, edit or delete Approval Groups from the ‘My Account’ page, by clicking on the ‘Manage approval groups’ link.
- To create a new Approval Group, select ‘Create New Approval Group’
- To edit an approval group, locate the group and select the ‘Edit’ button
Note: Updates to the group, will reflect against any contact it is applied to
- To delete an approval group, locate the group and select the ‘Delete’ button
Note: The approval group will be removed from any contact is applied to
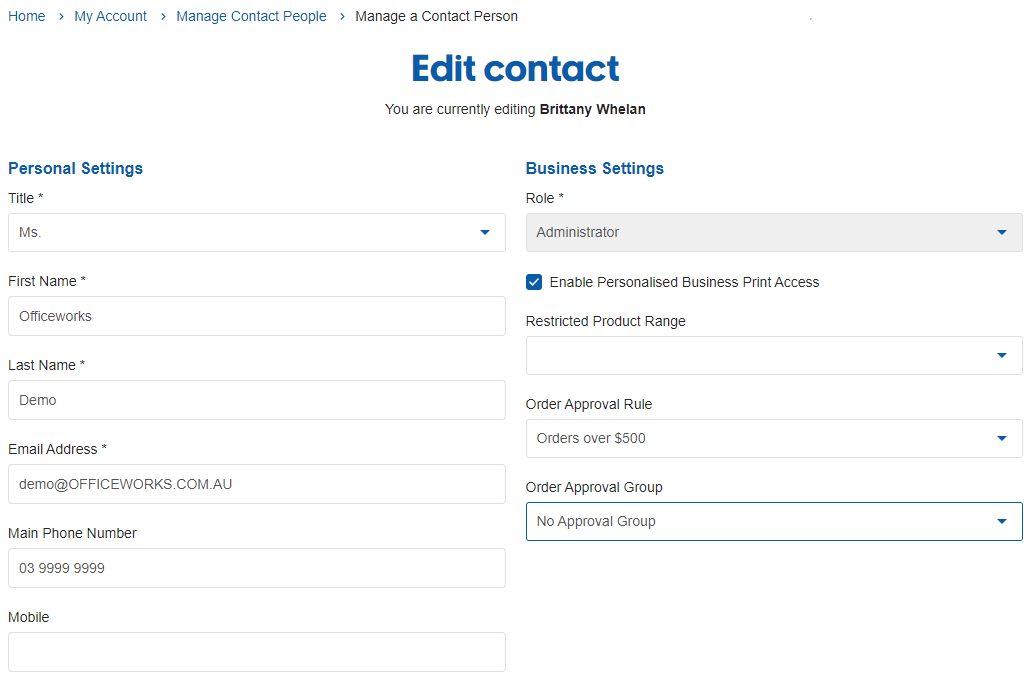
Applying Approval Groups and Order Rules to contacts
If you are an Administrator, you can apply or remove order approvals on a contact.
- From the ‘My Account’ page, click on the link called ‘Manage account contacts’
- Search for the contact you would like to apply/remove permissions, and select ‘edit’
- Locate the ‘Order Approval Rule’ dropdown, and select the appropriate rule
- Once a rule is selected, the ‘Order Approval Group’ dropdown will appear. Select the appropriate approval group.
If you are an approver on your account, you will receive an email notification informing you that an order requires your approval.
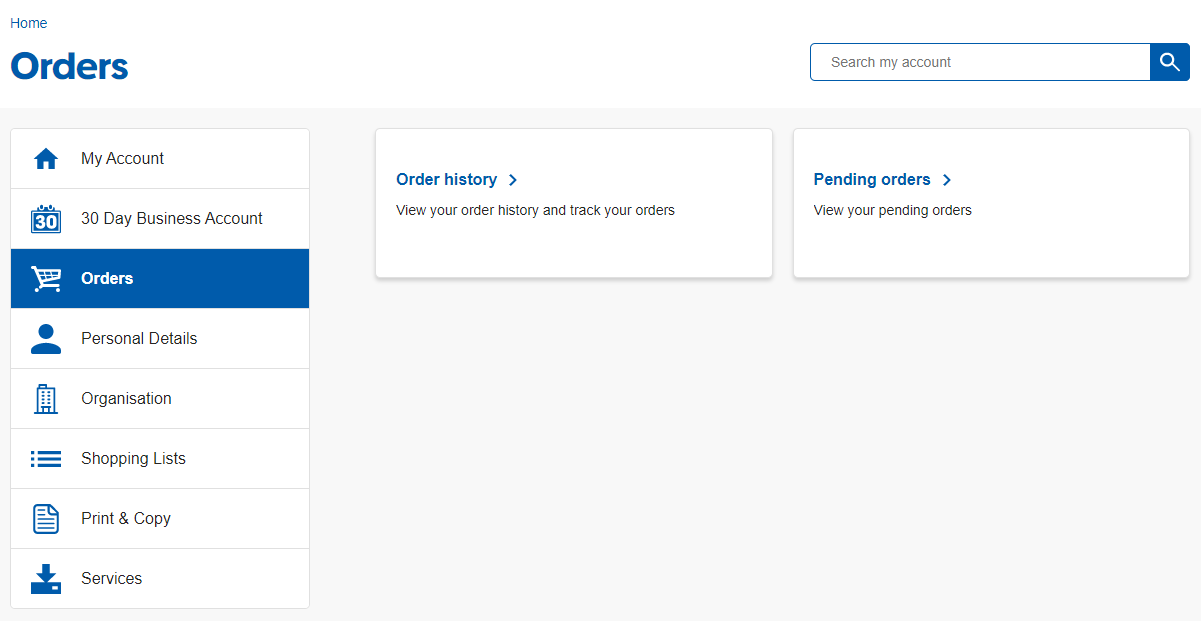
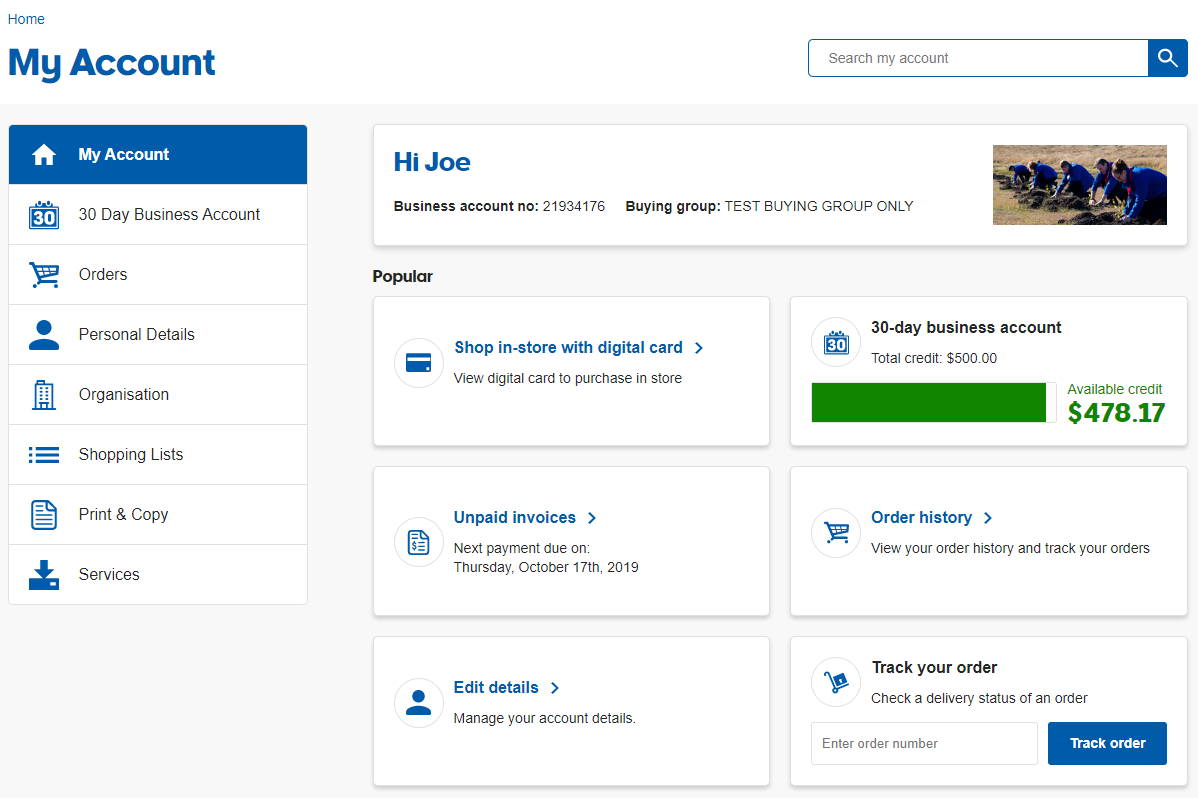
To view orders which are pending for approval, from the ‘My Account’ page, simply click on the ‘Pending Orders’ option, within the Orders box.
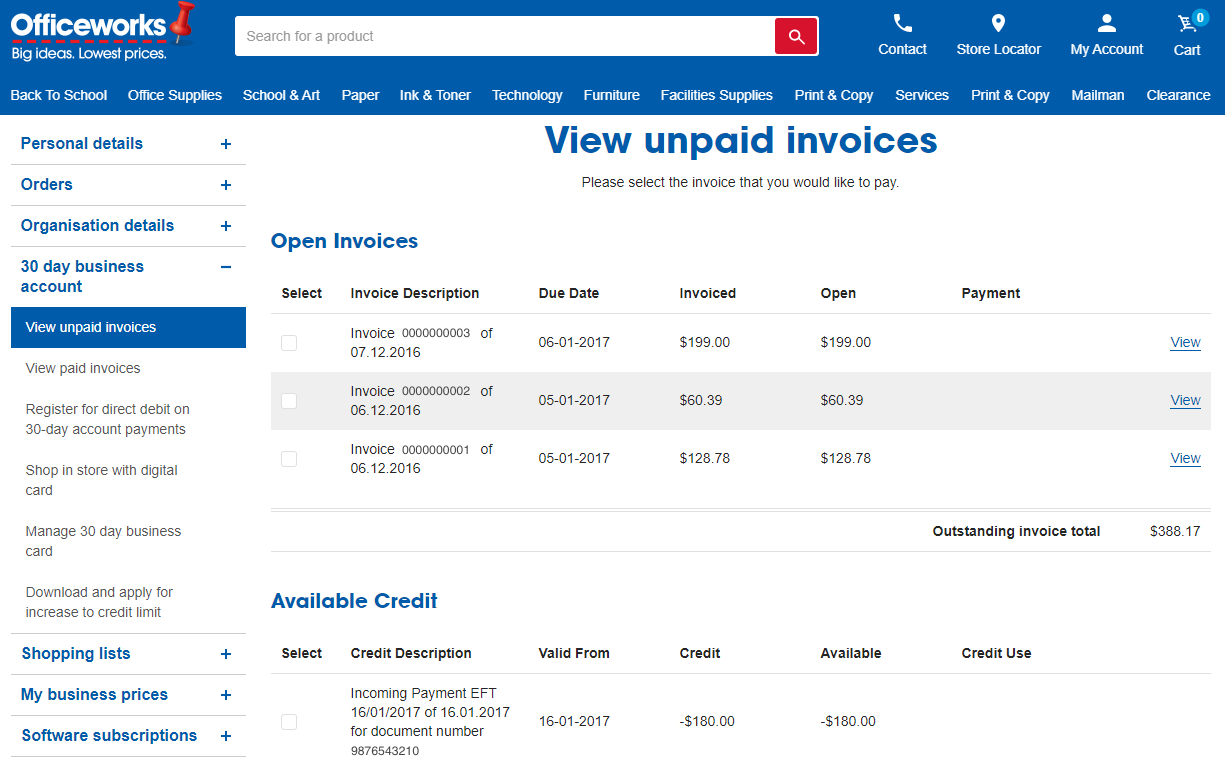
View and Pay Invoices
You can view Invoices, and also pay unpaid invoices online, for your Officeworks 30 Day Business Account.
To view paid invoices, from the ‘My Account’ page, simply click the ‘Paid Invoices’ option within the 30 Day Business Account box.
To pay an unpaid invoice, from the ‘My Account’ page, simply click the ‘Pay Now’ button or the ‘Unpaid Invoices’ option within the 30 Day Business Account box.
On the Unpaid Invoice page, you will be able to select the invoices you would like to pay, and progress through to pay for the invoice via credit card. Any credits applied to your account will be available for you to select and use as payment on this page.
Exclusive Products
As an Admin or member of your organisation, to view a list of your Organisation’s exclusive products, follow the below steps:
- Within
‘My Account’ , click‘Organisation’ - Then click the
‘Exclusive products’ tile.
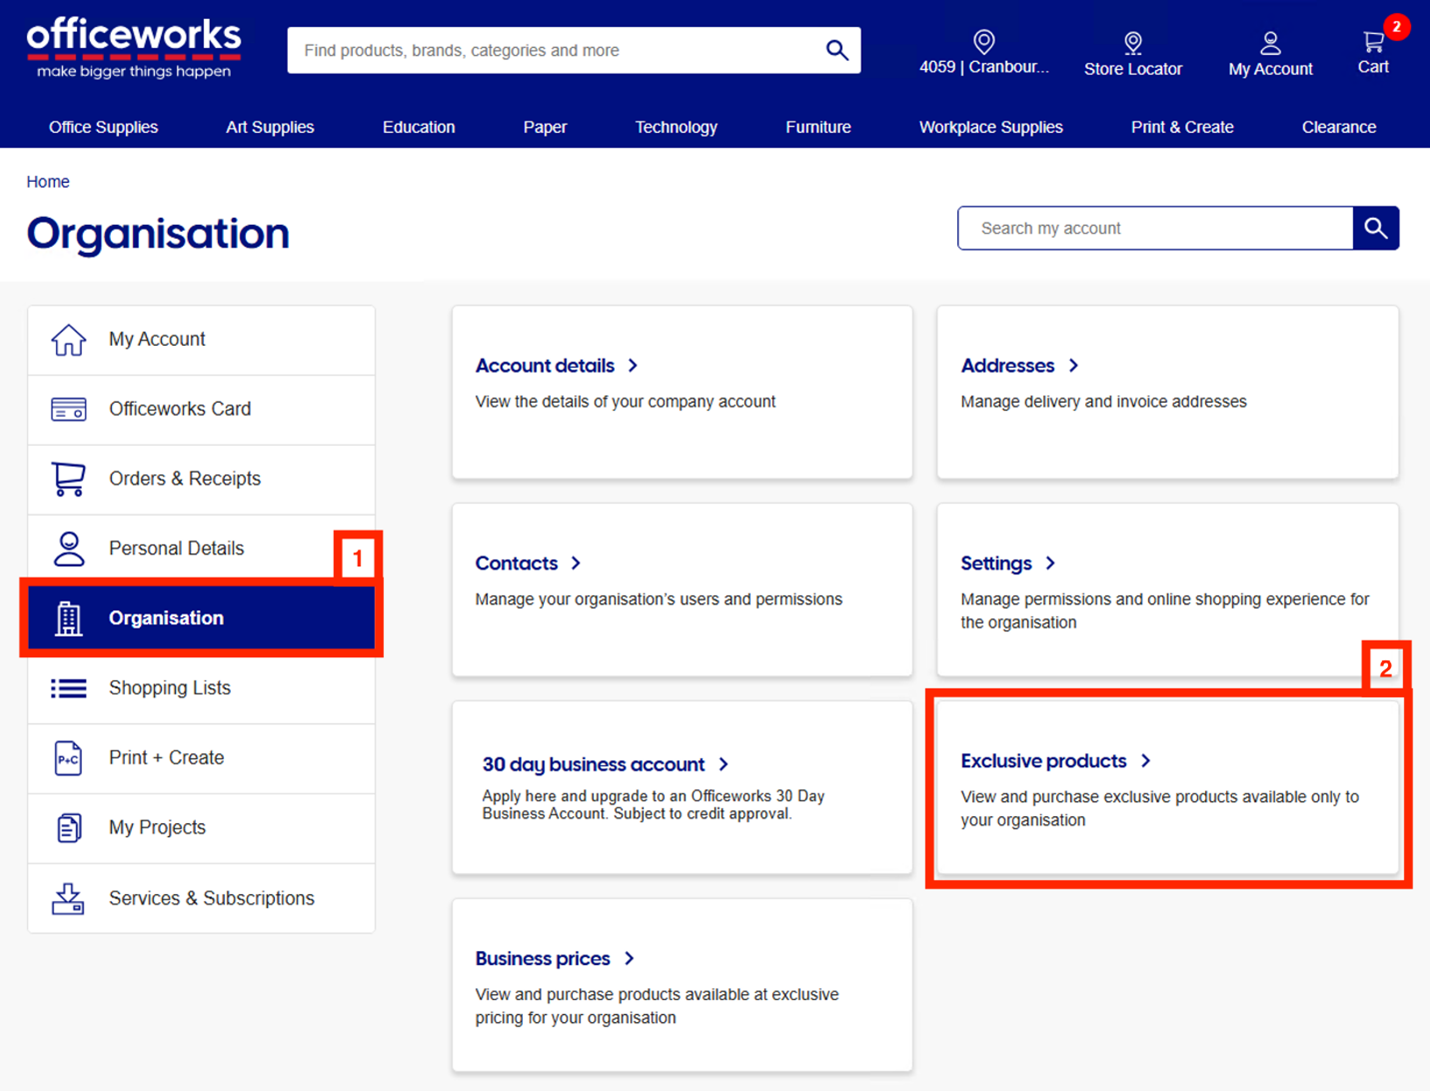
Or, from within one the subsections of
You’ll land on the ‘Exclusive Products’ page, with your products listed and options to add them to cart, shopping list, or compare list.
Upgrading an Account to a 30 Day Business Account
If you have an Officeworks for Business account, you have the ability to upgrade to a 30 Day Business Account through ‘My Account’.
From the ‘My Account’ page, simply click the ‘Upgrade to a 30 Day Business Account’ link to progress through the online credit application process.
30 Day Business Account Cards
As a 30 Day Business Account customer, you will have access to digital cards on mobile devices, to shop instore and easily transact on your account.
Account administrators are automatically equipped with a digital card. Contacts who are not administrators, must be given access to a digital card by an administrator.
Accessing a Digital Card
- From the ‘My Account’ Page, simply click on the ‘Shop in store now’ button.
- Present the digital card screen when purchasing at the register
Assigning a Digital Card
As an Administrator, you are responsible for assigning digital cards to any contacts listed on your account.
- From the ‘My Account’ Page, simply click on the ‘Manage 30 Day Business Cards’ button.
- Click the ‘Add Another Card’ button
- Select the existing contact or create a new contact, who you would like to apply digital card access to.
Cancelling a Card
You may have a plastic or digital card that needs cancelling due to being lost, or from team members leaving your business. Cancelling a card for both scenarios is completed following the below process
- From the ‘My Account’ Page, simply click on the ‘Shop In Store Now’ button.
- Click the ‘Manage All Cards’ button
- Identify the card you want to cancel, and select the ‘Manage button’
- Select the ‘Cancel Card’ button
Plastic Cards
If required you can also request a Plastic card in conjunction with a digital card. From within ‘My Account’ simply click the ‘Manage 30 Day Business Cards’ link and further select the manage button against the card you require a plastic card for.
To activate your plastic card:
- From the ‘My Account’ Page, simply click on the ‘Shop in store now’ button.
- Click on the ‘Manage all cards’ button
- Select ‘Manage’ against the card requiring activation
- Select ‘Activate your plastic card’
- Input the card barcode number, and select the ‘Activate Card’ button
Authority to Purchase
What is Authority to Purchase?
Customers with a 30 Day Business Account can create a single use barcode (in lieu of using a 30 day account card) to allow contacts not attached to their 30 Day Business Account to purchase products in store.
The single use barcode (the Authority to Purchase) is valid for up to 30 days from the issue date, for one-time use only, and can only be used in store.
Creating Authority to Purchase
As an Administrator, you are responsible for creating the Authority to Purchase. The purchase will be charged to your account. If you have a Cost Centre / Department / Site setup on your account, the cost of this purchase will be attributed to your department.
- From the “My Account” Page, simply click on the “30 Day Business Account” menu option, and then click on the “Authority to Purchase in store” link.
- Then click “Create an Authority to Purchase”, complete the fields and click submit.
- The Authority to Purchase will be generated.
- You can either print or email the Authority to Purchase barcode to your organization team members, which they can then use for their in-store purchase using your 30day account.
Using Authority to Purchase
To use the Authority to Purchase in store:
- Retrieve the Authority to Purchase from the admin contact of the 30 Day Account via email or print.
- Present the digital or printed single-use barcode when purchasing at the register in store.
Cancelling Authority to Purchase
Only the Administrator who created the Authority to Purchase can cancel this.
- Select the Deactivate button on the relevant line corresponding to the active Authority to Purchase.
- The status of the line deactivated changes to “cancelled”.
Custom Catalogues
Custom Catalogues allow your organisation to control which products your team can view and buy. If a Custom Catalogue has been assigned to your account, you’ll only be able to purchase products that have been approved by your organisation.
Shop from your Custom Catalogue
- Log in to your Business account.
- Browse or search for products and add available items to your cart as normal.
- At the top of product listing pages, you’ll see a message confirming your catalogue is active. Products not included in your catalogue will appear as ‘Restricted item’ and will be greyed out.
- Proceed to checkout as usual.
Important: If you added products to your cart before logging in and they aren’t included in your catalogue, you’ll need to remove them before checking out.
Manage your custom catalogue
If you’re a managed customer and would like to set up a custom catalogue for your organisation or update an existing one, please reach out to your Business Specialist.
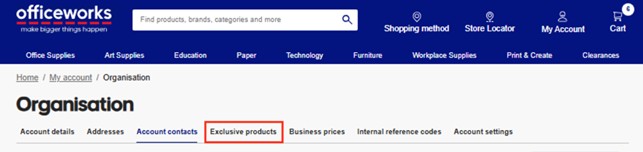
Business Prices
When you're logged in to your Business account, you can browse, compare, or buy from a curated list of products with special pricing for your organisation.
View products with business pricing
- Log in to your Business account.
- Go to “My Account”, “Organisation” >
“Business Prices”.
You’ll see a list of all products that have business pricing for your account.
Add products to your cart, save them to a shopping list, or compare them with other items.
Filter your results
From the search and category pages, use the options on the left (like “Availability” or “Category”) to narrow your search. To return to viewing all products with business pricing, uncheck the filters you’ve applied.
By default, the “Business Price only” filter is turned on when you access these products via “My Account”. You can uncheck it at any time to see a mix of products with business pricing and regular pricing.
Frequently Asked Questions
There is no business too big or small to hold an Officeworks Business Account.
If you have a valid ABN number, pass a credit check and can provide the relevant forms of identification needed in the application process then your business should qualify for a Business Account. You can apply online by filling in a quick and easy form.


Yes. Simply enter your Purchase Order number in the appropriate field when you reach the checkout page.
As an administrator of the account, you can also make this a mandatory field for all contacts on your account.
- Log in as an Administrator user
- Got to ‘My Account’
- Select ‘Account Settings’
- Find the option for ‘Purchase order required for all orders’ and ensure this is switched to ‘YES’
If you have a 30 Day Business Account, you may find that the credit applied to your account does not meet your business’ requirements.
From the ‘My Account’ Page, simply click on the ‘Apply for credit increase’ button.
You will be directed to a page, displaying information on how to submit your credit limit increase request.

By default, we display all product prices inclusive of GST.
If you have a Business Account and would prefer to view product prices excluding GST, you can enable this by yourself via ‘My Account’:
- Log in as an Administrator user
- Got to ‘My Account’
- Select ‘Manage Company Options’
- Change the ‘Display prices inclusive of GST’ option to be ‘NO’.
- This change will be automatically saved.
You must be an Administrator user for your Business Account in order to change this setting.

If you are an Officeworks contract pricing customer, an icon will appear on all contracted products to let you know that your contract pricing applies.
As an Officeworks contract pricing customer, you can view a list of your contract priced products by clicking on the ‘View my Contract Price List’ link on the ‘My Account’ page.
Alternatively, you can search for products using the search box in the top-right corner of the screen, and then click the ‘Show only Contract Prices’ button. This will show only contract priced products that match your search criteria.
A change of ABN is not permitted on an existing 30-day account. If a company is trading under a different ABN, you will need to apply for a new 30-Day Business Account under the new ABN.
You can access our online application form, by going to our registration page
The credit limit available to 30 Day Business Account holders varies depending on your specific business needs and credit history. As you will have 30 days to pay your invoice once the application is approved, please consider both your everyday business essentials as well as your future needs and one-off purchases, such as computers, storage and furniture when selecting your required credit.
Payment remittance advice can be emailed to eft@officeworks.com.au
If you have a Business Account then by default all of your users can create, update, and delete addresses that belong to your Business Account.
If you would prefer that only Administrator user be able to manage addresses, you can control this:
- Log in as an Administrator user
- Got to ‘My Account’
- Select ‘Manage Company Options’
- Change the ‘Allow addresses to be managed by non-admin people‘ option to be ‘NO’.
This change will be automatically saved.
eg. Where is my delivery?
| Ask us a question Tweet us @Officeworks Monday - Saturday: 9am to 5pm AEST |
Call us on 1300 OFFICE (633 423) Monday - Friday: 8am to 6pm AEST |
Send us an email Contact us |