


Looking for creative (and mess-free) school holiday fun? This weaving activity for kids will keep them entertained and promises a new artwork to proudly add to your fridge’s gallery at the end.
Yarn crafts have been praised for their positive effects on mental health in adults, with notable benefits including reduced anxiety and stress and increased happiness, but they also have great developmental benefits for kids, too. Weaving is not only a fun sensory activity for little ones, but improves essential skills like concentration, problem solving, patience and fine motor skills.

Ready to weave your next masterpiece? Get started with our easy step-by-step guide, from making a cardboard loom to learning about the basic stitches.
Suitable for Ages 5+

Create a DIY Cardboard Loom
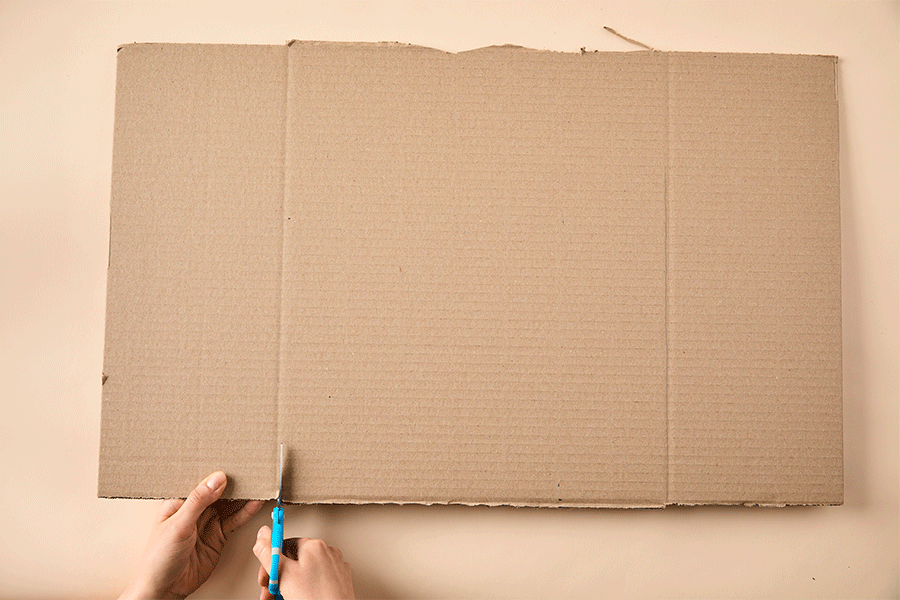
Step 1: The size of your loom will determine how big your weave will be. You can make your loom to any measurements you want. For this project, cut out a 24cm x 30cm piece of cardboard, ensuring the shorter edge is parallel to the cardboard’s corrugation lines.
Step 2: Measure and mark with a pencil every two centimetres along the shorter edges of the cardboard.
Step 3: Cut each mark about 1cm-deep.

Step 4: Using some of your leftover cardboard, cut out two strips of cardboard about two centimetres wide and the same width as the shorter edge of your cardboard base.
Step 5: Using PVA glue, stick the cardboard strips just under the cut marks, both at the top and bottom of your base. This will make it easier to weave your yarn (known as the weft) through the vertical strings (known as warp strings).

Step 6: To add your warp strings, tie the end of your string over the first notch at the top of your frame. Pull the thread down towards the opposite end of the frame, push it through the first notch, loop it behind, then pull it back through the second notch and up towards the top of the frame. Continue looping and pulling the thread across the loom until all the notches are covered.
Hot Tip: Keep even tension; taut but not overly tight or you might bend the cardboard.
Step 7: Cut the end of the string and fasten to the back of the cardboard with some tape.

SEE ALSO: 4 Construction Activities for Kids Who Love to Build
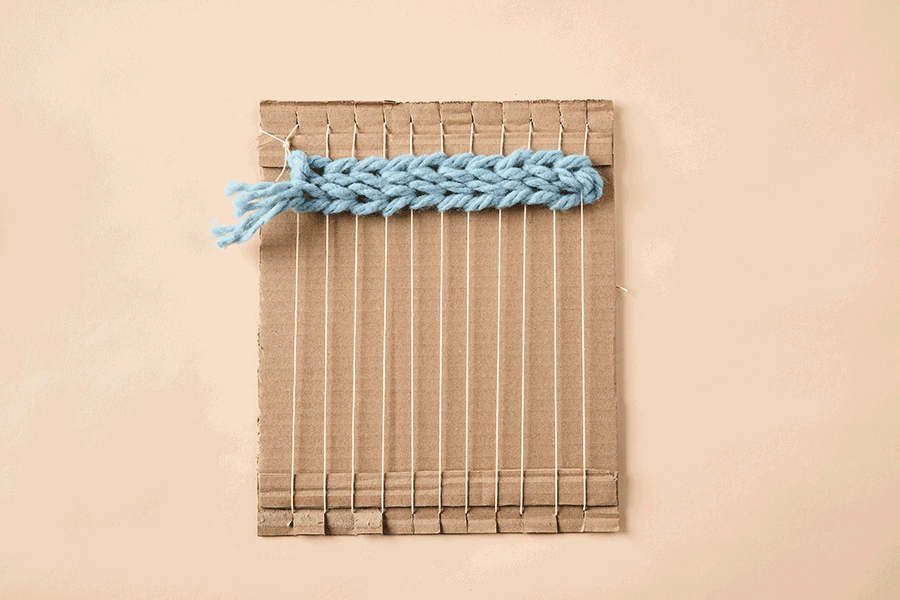
Basic or Plain Stitch

Step 1: Select a yarn and pull out a desired length from the ball. The more you use, the more rows of that colour you will have in your weave.
Step 2: Create a point at the end of your yarn by wrapping some masking tape around it. This will make it easier to weave your thread.
Step 3: Take the end of your yarn and weave it through the warp strings by alternating the yarn above and below the warp strings. Once you get to the end, make sure you wrap your yarn around the last warp string and continue weaving your next row.
Step 4: As you continue each basic stitch row, make sure each row alternates its pattern from the one before it. This means if you started your previous row over the first warp string, then your next row should start by going below the first warp string and continue the pattern from there.
Step 5: Once you’re done, trim the inactive yarn (the end attached to the yarn ball). Be sure to leave a long tail of yarn on both sides of the loom in order to tuck the loose ends in at the very end of the piece.

Step 6: Choose a new yarn colour and follow steps 1 to 5 again to continue weaving down your loom until you are happy with the length.
Hot Tip: Encourage kids to keep consistent tension throughout their weaving. Their yarn should sit snug against the warp strings but not tight in order to maintain the shape throughout.

Braid Stitch
Step 1: Cut a length of yarn, at least double the width of your loom. The longer the piece of yarn you have the more rows you’ll be able to create.

Step 2: Fold the length of yarn and match the two ends together.
Step 3: Take the loop end and lay it over the first warp string starting from the left.
Step 4: Take your thumb and pointer finger pinched together, place them in between the yarn loop and under the warp string.
Step 5: With your other hand bring the matched loose ends to your pinched fingers and then pass them under the warp string and through the yarn loop. Gently fasten and bring together on the warp string.

Step 6: Continue this over every warp string till the end. If you have enough yarn to continue a second row, wrap your yarn through the end warp string, with the loose ends resting on top of the warp strings, and continue the stitch in the opposite direction underneath your previous row.
Step 7: Choose a new yarn colour and follow steps 1 to 5 again to continue to create braids down your loom until you are happy with the length.
SEE ALSO: 3 Activities for Kids to Encourage a Love of Nature

Adding Fringe

Step 1: To add some fringe to the end of your woven wall hanging, take a length of yarn and double it over.
Step 2: Take the double loop end and lay it across the warp string you’re working on.
Step 3: Just as you’ve done with your braid stitch, pass the loose ends under the warp string and through the yarn loop.
Step 4: Gently fasten together and arrange the knot so the fringe is hanging down and the knot is facing forward.

Step 5: Continue this on all desired warp strings.
Step 6: Trim the loops on the loose ends and cut to your desired length.

Step 7: To finish, add a final few rows of a basic stitch to keep your fringe from falling off.
SEE ALSO: How to Create Tape Art With Kids
Casting Off Your Woven Artwork

Step 1: Turning your woven masterpiece into a wall hanging? Once you’ve completed your weaving, slip your warp string loops off their notches and slip a stick through the loops. Push upwards to tighten your weft strings up against it.
Step 2: Pack your weft together gently by pushing it up so it is compact and you have enough warp string to tie off.

Step 3: Slip the lower warp string loops off the loom and cut each loop. Turn the weave over.
Step 4: Using two warp strings at a time, fasten and finish the woven artwork by tying strong knots.
Step 5: Disguise them by tucking them up into the weft stitches as best as possible.
Tucking in Your Ends

Step 1: Use a yarn needle to weave your ends into the back of the weave.
Step 2: Alternatively, create a pointy end with masking tape to push through the weft channels.
Step 3: Trim the excess once the yarn has been tucked in.

Step 4: Complete your wall hanging by adding a length of string, tied at each end of the stick, to hang it from a hook.
What You’ll Need
- PPS Moving Box Small 403 x 301 x 330mm
- PPS Masking Tape 18mm x 50M
- Studymate Soft Grip Scissors 135mm Blue
- Kadink PVA Glue 120mL
- Born Twine Thread 5m Beige
- Born Chunky Yarn 100g Ecru
- Born Chunky Yarn 100g Light Blue
- Born Chunky Yarn 100g Mustard
- Born Chunky Yarn 100g Olive Green
- Born Chunky Yarn 100g Salmon
- Born Chunky Yarn 100g Steel Grey
