


Meet Lydia ‘Squid’ Morgan. This Sydney-based illustrator, artist and muralist is a genius with a brush and a can of paint, creating the most incredible indoor and outdoor wall murals for clients like Liverpool City Council, Stockland and UNSW. “I got my first opportunity when I was still in uni as part of a student competition and painted a mural in the library,” says Lydia. “It was a great first step.”
While Lydia is now something of a wall murals expert, she’s all for encouraging beginners to give it a go, especially for kids’ bedroom murals. “It’s great fun and personal,” she says. “I think it’s thrilling for kids to be able to paint directly on the wall.”
And if your wall mural ideas don’t all go to plan? “We’re using acrylic paint,” she says. “So it’s really easy to remove or paint over if you change your mind.”
Get Started Creating Kids’ Bedroom Wall Murals

The first step is to decide what your bedroom wall mural will look like. “If you’re doing this as a family project or you’re painting it for a child, I would suggest you talk with them and get a good idea of what they like and what they’re excited about,” says Lydia. “You don’t have to include every single thing they say, but it’s a good place to start.” For this story, Lydia created a wall mural for a kid whose likes included the colour pink, as well as horses, marsupials and dogs.
You could also look for inspiration for murals for walls online and on social media. Lydia, who’s on Instagram, is a fan of Nico Nicoson and Lotte Alexis Smith, and has developed her own iconic aesthetic. “I’ve developed my own style with bold block colours, abstract shapes and very illustrative elements, like overlapping circles, stars, wiggles and spiky things,” she says. “That’s mostly where I’m at at the moment. Also, I just love drawing people and animals, and usually my designs start with that.”
Using the references you’ve discussed and any inspiration you’ve found, try sketching out your wall mural ideas on some paper until you’re happy with your design. Or, if you prefer, download the template for the design Squid has created.
Choosing Colours for Your Wall Mural Design
Once you have a bedroom wall mural design you’re happy with, the next step is deciding on the colours you want to use. For this step, Lydia finds it helpful to scan her sketch into a computer.
“I clean up my designs and experiment with colours using Adobe Illustrator,” says Lydia. However, if you don’t have access to this software, you could print out some scaled down copies of your design and colour them in with markers or pencils to help you decide on hues.
Stick to a limited palette of five or so colours for your mural design. Try starting with your favourite shade then choose other colours that complement it.
“Put effort into planning your design and colours ahead of time so that when you’re painting you don’t have to make any of those decisions and can just focus on your technique,” says Lydia.
SEE ALSO: How to Create a Jacaranda Tree Artwork with Brush Pens
Gather Your Mural Painting Supplies

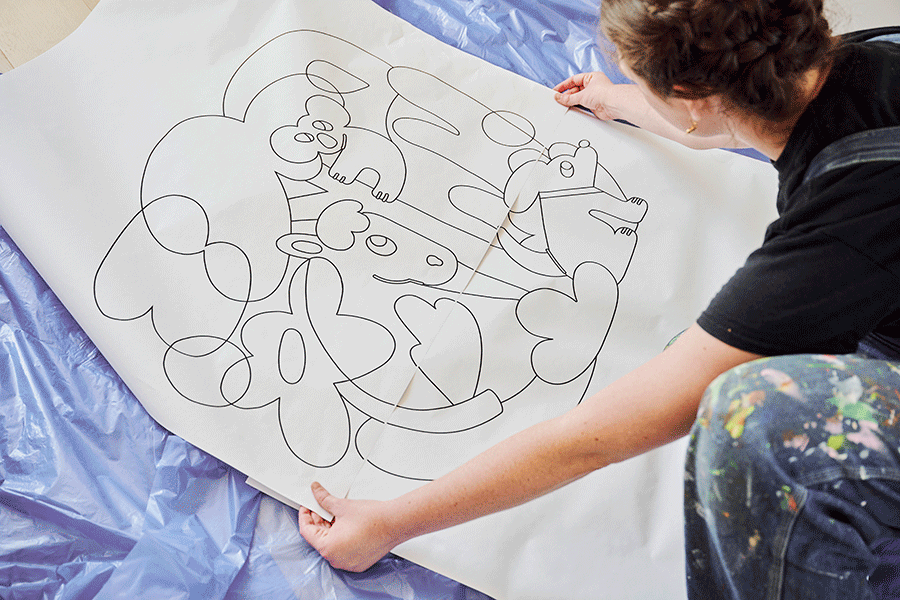
Next, drop by Officeworks Print + Create to get your mural design or the template printed at full size using the plan printing service. Lydia printed her 1m x 1m design over two B1-sized sheets. The plan paper is translucent, so you can see the design on the reverse once it’s printed out for you.
Another recommendation for your kids’ bedroom mural design: get a small A4 print of your completed mural design with colour to use as a guide as you paint.

While your mural design is being printed out, you can stock up on paints in your chosen colours and accessories, such as brushes, tape and chalk. You will also need a couple of other basic painting supplies, such as mixing tubs and a drop sheet.
What You’ll Need
- FrogTape Multi Surface Tape 24mmx55m Green
- Kadink Chalk Assorted Colours 12 Pack
- Gripwell Tape Measure 5m
- Essdee Fabric Ink Roller 100mm
- Born Acrylic Paints
- Royal & Langnickel Flat Brush Set 3 Pieces
- Royal & Langnickel Medium White Paintbrush Set 12 Piece
- Mixing pots (we used recycled food containers)
- Drop sheet
- Posca Pens
SEE ALSO: How to Make Textured Art That’s Truly Unique
Preparing Your Wall for a Mural Design

Before you paint your wall mural, it’s a good idea to wash the wall with soapy water and a cloth. This removes any grease or dirt that may interfere with the application of paint. Lydia also recommends laying down a drop cloth and using painters’ tape to protect electrical outlets and skirting boards.
Once you’ve prepped the area, it’s time to decide exactly where you want to place your artwork. “I measure the wall to find the midpoint and make a mark,” explains Lydia. Then use your big printouts to work out where your design should go based off that. “Next, I’ll mark where I want the top and bottom of each of those sheets to go,” she adds.
The next step is pretty clever: Lydia applies chalk to the back of the large printed sheets, so that the outline of her mural design transfers onto the wall. Here’s how to do it…
Step 1: Flip over your printed sheets of paper and lay them on a flat surface (it helps if it’s light coloured).
Step 2: Following the outlines, which should show through the paper, trace over the mural design with coloured chalk, pressing quite hard.
Step 3: Align your printed artwork with your wall markings and tape the top edge of the paper to the wall. Check that your placement is perfect and the artwork is level.
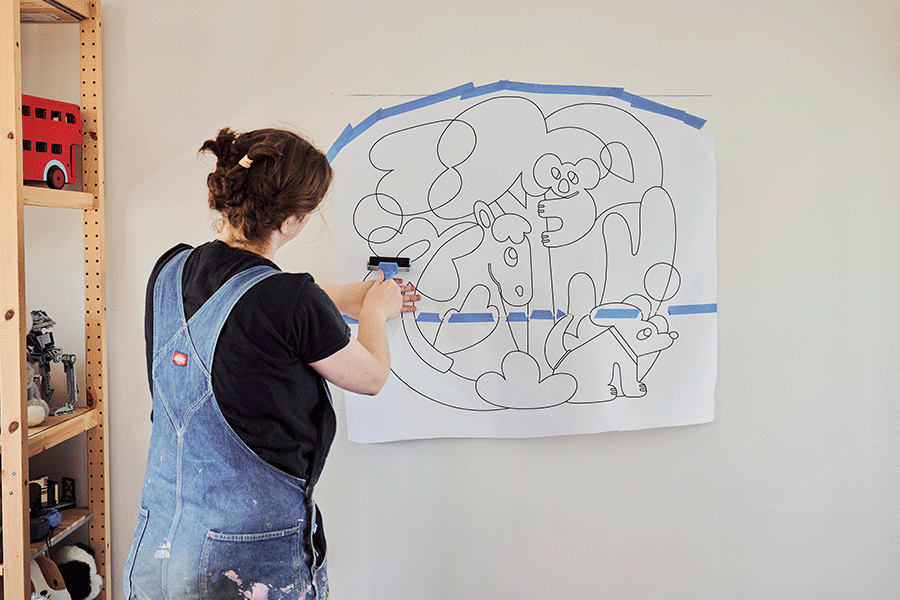
Step 4: Smoothing the paper down from the top as you go, use a print roller to methodically and firmly roll over each section of the design. The pressure will transfer the chalk to the wall, so make sure that you cover each section a few times and apply enough force.
Step 5: Before removing the paper from the wall, lift it up to make sure that every area of the design has transferred clearly. If there are any gaps, go over that area with the roller again.
Step 6: Remove the paper from the wall. You should see a chalk outline of your design. If the outline is too faint in any spots, go over it directly with chalk.
Now You’re Ready to Paint Your Bedroom Wall Mural

Step 1: Make sure you’ve popped your drop sheet down on the floor. Transfer paint to a small pot and, if you decide to mix your own colours, do so now. The paint should be used as is, without any added water or paint thinner.
Step 2: Starting with the largest area of colour, paint one colour at a time. Each section will need two coats of paint, but wait until the first coat is completely dry before you add further paint or do touch-ups.
Step 3: In between colours, be sure to wash your brushes really well with water to avoid dry paint from building up.

Step 4: Paint with smooth strokes, using a larger brush for big blocks of colour and smaller brushes for finer areas of detail. Acrylic paint can pick up stroke marks, so try to keep your brush strokes as smooth as possible. For fiddly details, like eyes, you can also use Posca pens for accuracy.
Step 5: Once you've completed both coats of paint, your bedroom wall mural is done! Acrylic paint dries pretty fast, but Lydia advises giving your mural a week or so to settle before you wash or wipe the wall.
SEE ALSO: How to Make Your Own Gel Plate Print
This article was originally published in December 2022 and has been updated.
